Showing posts with label Saddle Ridge Ranch. Show all posts

Friday, July 23, 2010

Decorated Rooms

I finally uploaded the photos of the decorated rooms. We had 54 kids this year!

Click to see Web Albums

Thursday, July 1, 2010

Time to Paint Your Wagon!

I am glad to say I have officially finished the covered wagon! I had my fair share of problems with getting it built. I learned quickly that I do not work well with chicken wire. All complications aside, the final product turned out well and is pretty sturdy. Now, onto my final how-to:

How-To
  • First, take a large wardrobe box and cut it to the shape of a wagon. Then, hot-glue it together.
  • Next, dry-brush the box to create a wood finish.
  • After that dries, the fun begins. I had a lot of trial and error with attaching the chicken wire to create the arc of the wagon cover. What worked the best, was to cut off the amount of chicken wire you need to create the shape of the wagon cover. Then using metal wire (I used the wire that was used to bundle the chicken wire I bought), loop the wire through the box and twist it around the chicken wire to anchor it to the box.

  • Once your frame is built, take the fabric you want as your cover and attach it to the chicken wire. I sewed the fabric on the front and back of the chicken wire, then I hot glued the fabric along the side of the box.
  • To create the wheels, take strong, stiff cardboard and draw and cut out the size wheels you want. We are going attach a 12" wooded cross stitching hoop to the inside of the wheel, so make sure it fits your cardboard. Once they are cut out, paint and decorate them.
  • Once they are dry, hot glue the cross stitching hoop to the back your wheel. You'll need to have a total of two cross stitching hoops, because you can use both the inner and outer hoops, so you'll have one hoop for each wheel.
  • After the hoops are attached to the wheels, take two square wooden dowels and cut them to match the width of your box plus the width of two of your cross stitching hoops. Then hot glue the dowels to the base of your cross stitching hoops to create an axis type base for your wagon.
  • Once these are good and dry, slide them under the front and back of your wagon.

Now you have a covered wagon!
A lot of people have told me they are making covered wagons. Email me your finished product; I would love to share some other wagons and how they were made.

So, as I said before, this is my final how-to for this year's theme. Thank you to everyone who has followed this blog. I have enjoyed sharing decorating ideas and tips, and I plan on doing so again next year, so bookmark me and start checking in around December (I hear next year's theme is New York). I'll post some pictures of the rooms decorated sometime next week. I hope everyone has a wonderful and successful Bible school!

Wednesday, June 30, 2010

A Hat Rack for the Cowpokes!

I am proud to say that the covered wagon is almost done! I am actually writing this how-to while the wheels dry. Hopefully it will be finished tonight. In the meantime, here is a quick and easy way to make a hat rack for the Bible Study Bunkhouse. All you need is some cardboard, paint, and 3m Adhesive Hooks.

How-To
  1. First, draw and cut out the shape you want for the backboard of your hat rack.
  2. Next, paint the card board the color you want. I wanted mine to look wooden, so I dry brushed the cardboard to look like a wood grain.
  3. Then spray paint the hooks the color you want (make sure your spray paint adheres to plastic). 3m also makes a metallic looking hook if want a metallic finish without having to paint.
  4. Once everything is dry, follow the directions on the package to adhere the hooks on the cardboard backing.
Now you have a place to hang your cowboy hat and lasso!

Saturday, June 26, 2010

The ABC's

After getting back in town, I've slowly started finishing up the last of the decorations, all of which I hope to have up by the end of next week (The World Cup has caused some distractions). In the meantime, I've created some ABC signs for the Missions, Crafts, Music, and Bible Study rooms. I like to have the ABC's of becoming a Christian up in all the classrooms, so each year I make some posters that fit the theme of each room. They can be downloaded below:

ABC Signs


Please let me know if you notice any mistakes on the signs. They were created under a lack of sleep and the constant buzz of the vuvuzela horns coming from the soccer games; perfect conditions for typos! :)

Monday, May 31, 2010

Quick & Easy Faux Fireplace

I finally finished the faux fireplace for the Bible Study Bunkhouse! It seemed whenever I was about to finish it up, I would run out of hot gluesticks or I would burn myself. Hot glue and I have never really gotten along well. Hot glue problems aside, this is a quick and easy fireplace to make.

How-To
  • First, I took a large cardboard moving box, and cut it down to the size I wanted (I split my box in half). If your box is already the size you want, then just tape it together. After that was completed, I cut the smaller square opening for the front of my fireplace.

  • Next, I cut out a piece of the leftover cardboard to cover the back of my fireplace. I held off on attaching it because I wanted to paint it first. If you left your box intact and did not cut it to make it smaller, this step isn't necessary.
  • I wanted a stone fireplace, so I painted my box various shades of grey. Once that was dry, I painted lines to look like grout between the stones and added some darker shading to the stones. After finishing the front of the fireplace, I painted the piece of cardboard I cut out for the back of the fireplace.
  • After everything was dry, I hot glued the cardboard piece on the back of my fireplace.
  • I cut out another piece of cardboard, so I could make a mantle for the fireplace. I cut it wide enough to cover the top and long enough to have about two and half inches leftover on each side.
  • Then I dry-brushed the cardboard to give it a woodgrain appearance. Once it was dry. I hot glued it onto the top of the fireplace.
  • To make a fire for the fireplace. I took a round piece of cardboard and glued it in the center of a sheet of tissue paper. Then, I just continued to glue layers of red, orange, and yellow sheets of tissue paper on top of each other. Once it was dry, I flipped it over (cardboard side facing up) and scrunched the tissue paper up around the cardboard until I got it the way I wanted it. When it is set up in the classroom, I am going to place several electric tea lights inside, on top of cardboard, to make the fire light up and flicker.
  • I then took some brown paper bags and twisted them into a log shape and took a brown paint pen (or marker) to draw lines to make them appear like logs. I placed these around the fire.
  • When I set it up in the classroom, I will take grey paper and tape it to the wall behind the fireplace to make a chimney.
  • If you want to make the appearance of having soot inside your fireplace, you can take black spray paint a lightly spray it inside your fireplace.

Enjoy your new fireplace for your Bunkhouse!

Thursday, May 27, 2010

The Three R's of VBS

Each year I do my best to use the three R's of VBS: Reuse, Recover, and Refurbish. The three R's help me each year to save time and, more importantly, money. Over the weekend, I went through the storage and found a few things that could be used again this year.

Cokesbury's Circle G Arch

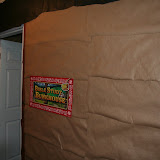
Back in 2005, I used Cokesbury's Circle G VBS. Our church still had the arch that was sold as decoration. I removed the Circle G logo and cut out out a new logo out of cardboard. I then dry brushed it and painted the Saddle Ridge Ranch logo.

Snow Owl

I used the owl when we did Arctic Edge. I bought a basic decoy hunting owl. I bought mine at Dick's Sporting Goods for around $5 (I got a discount because he only had one eye). These are great for decorating. They can be placed about anywhere to create some faux wildlife in a room. I repainted this one to turn him into a snow owl to fit the theme of Arctic Edge. I used acrylic paint to turn him white and fake snow paint around the base. For this year's theme, this isn't really necessary. You can use him just as he is if you do not want to paint.

Tumbleweeds

I made these for last year's VBS. They are very simple to make. I bought a grapevine wreath at Hobby Lobby. I clipped the vine that held the wreath together and then unraveled the entire wreath. Since it was already in a circle, all I had to do was take the vine and twist it in different directions to create a sphere. You can take floral wire and twist it around where the vine intersects to hold it together. Mine held together on its own, so I didn't have to use the wire. I was able to get three tumble weeds out of one wreath.

Former Termite Mounds

I used Great Stuff Expanding Foam to make termite mounds for last year's VBS. I took the foam and sprayed it a pattern on wax paper. Once it was dry, I peeled it off and painted the foam. I wanted to reuse them for this years theme, so I repainted them with the same brown and black spray paints that used on my other cave rocks. Now I can use them as cave rocks in the Firefly Caverns.

Farm Bags

I made these for the bible study room with the Boomerang Express theme. I cut up burlap and sewed small sacks that could be tied at the top. I stuffed them with whatever was laying around the house. They were great to stick in corners of the classroom. This year I am going to use them in Blazing Star Stables.


Monday, May 24, 2010

Carving Out Cave Rocks


x
x
x


I wanted to have some basic carved cave rocks to mix in with the paper cave walls in the Firefly Caverns. So, I purchased a large sheet of pink insulation foam. There were several brands available at my local Home Depot. Honestly, I just chose the cheapest.

How-To
  • First, I peeled off the layer of plastic coating that was on the outside of the board.
  • Next, I drew out the rock shapes that I wanted to cut out of the foam.
  • Then I used an x-acto knife to cut out the basic shape. The sharper the knife the better. It does make a big difference on the edges of the foam when carving. For me, this was the hardest step. After four hand surgeries, I do not have a lot of strength in my hand, so I did this step in stages to give my hand a break.
  • To create the details in the rocks, I tried two different methods.
    1. I took the x-acto knife and used the flat edge to scrape horizontal curved lines to create a layered look to the rock. Then I used the pointed end of the knife to scrape out deep vertical crevices throughout the rock to create cracks in the rock.
    2. The other method I tried was using a wood burning tool (I kept a glass of water near by to be on the safe side. I don't have the best of luck when it comes to hot surfaces). I used the tool to create cracks and crevices across the rock. I barely touched the surface when I was drawing, because it doesn't take much pressure for the tool to burn through the foam.
    Carved with X-Acto knife
    Carved with Wood Burning Tool
    1. After carving the details, I used spray paint to finish up the rocks. I mixed a light flat tan, a glossy brown, and a glossy black. I also used a sandstone spray at the base of the rock. I have heard that the spray paint can eat through the foam. I haven't had this happen, but I would suggest testing your paint on a small surface before you paint your entire rock.
    Happy rock carving!


    Thursday, May 13, 2010

    Faux Window Fun!

    So, after a very disappointing 7th game, ending the Penguins post-season, I woke up this morning not in the best of moods. This motivated me to get working on more VBS decorations (that I had been procrastinating a bit on), including the Faux Window for the Bible Study Bunkhouse. What better way to get over Stanley Cup Playoff blues than decorating and show tunes! ;) So let's begin!

    How-To
    • To begin, I spray-painted two sheets of thick drawing paper a light brown. I used thick paper, because I have to attach it to concrete walls that things do not like to stick to, so the lighter the better. Cardboard and posterboard would also work great!
    • While that was drying, I used the free Open Office Publisher knockoff (I'm a poor college student; I use what I can get) to print out a poster of an image from a horse ranch and assembled it (mine was about 3x2 pages).
    • I then took clear saran wrap and covered the poster to make it look like glass.


    • Once the the spray-painted paper was dry, I cut it into 6 strips (long enough to match the length and width of the poster)
    • I split the other sheet of spray-painted paper in half to make shutters for the window. You can also use fabric and put curtains around the window.
    • Next, I dry brushed the strips of paper for the window frame and the window shutters with a darker brown to get a woodgrain effect. I used a brown paint pen to draw the lines on the shutters.
    Dry Brushing


      1. Take a stiff paintbrush (natural hair or one that paint has stiffened due to dry paint).
      2. Dip the brush into your paint. Only cover the bottom 1/3 of the brush.
      3. Dab your brush in a paper towel or a piece of paper to knock off excess paint.
      4. Take a few practice strokes on a scrap piece of paper, before you paint on your window.
      5. Take long strokes across your paper until you get the effect that you want.
    • Once everything is dry, glue your strips of paper together in a pattern of a window.

    • Finally, I attached the window frame to the poster covered in saran wrap, and then attached the shutters to the sides of the window. I used masking tape (mainly because I was out of hot glue).


    Now you have a faux window!

    Wednesday, May 12, 2010

    Fun and Games in Music

    Every year I teach music. Since music is hard to stretch out the full length of class time, I adapt some of the activities suggested by Lifeway to introduce the song of the day. Typically they do not provide templates for any of these games, so I spend a good bit of time making the games (or else I'm scrambling 5 minutes before class, depending on how organized I am that year).
    • Day 3: An animal print matching game- I make group matching games each year. I make index cards with letters and a images on them. I either hide the cards or pass them out as kids answer questions. In the room, I tape up matching images on the wall, so when the card with matching image is stuck on top of it, the cards will spell out a word. This year I have the words ADMIT, BELIEVE, and CONFESS, each with a matching animal print below the letters. Simply cut up the letters (with the print also attached) and cut out the matching prints. Tape the animal prints along the wall (or anywhere else). The kids can then match the letters to the prints and spell out the words found in the day's song
    • Day 1: Amazing Animals- Two activities are suggested for Day 1 that emphasize the amazing animals that God has made. I adapted these two activities into games for different age groups. For the younger age groups, I am following the first activity that suggest giving the children a slip of paper with an animal name written on it, and instruct them to walk around the room acting like that animal. I have a lot children who cannot read, so I provided squares of paper with an image of animal on it instead. For the older kids, I have a matching game with images of animals found out west and a matching fact about each animal. I will hide them throughout the room and have the kids work together to match up the cards. Both activities are found in the template below.
    • Day 2: Fishing Game- On day three Lifeway suggests playing a fishing game with phrases found in the day's song. They say to attach a magnet to the end of a fishing pole and attach paper clips onto the paper fish with the phrases printed on them. Below is a template for the fish.
    • Day 4: "Like Jesus" Concentration- To play "Like Jesus," Lifeway says to create a concentration type game by using images of heroic western figures, and one card with an image of Jesus. Once all the matches are made, the card with Jesus on it remains, because Jesus has no match. I made a template with 17 matches.

    Have fun!

    Tuesday, May 11, 2010

    Cardboard: Your Friend and Mine

    For college students all across America, finals are coming to an end, signaling the start of the moving season. With the moving season comes tons of cardboard boxes. On my last day of classes, I took advantage of this time, and scavenged some boxes to use for decorations. I love using cardboard because it is strong, easy to paint, and cheap (or free!). It is great to use to create space-fillers and decorative elements. Throughout the next couple of weeks I will continue to add cardboard creations to this section.

    Space-Fillers
    • I browsed through the clip-art and chose some things to sketch out on the cardboard to use to fill up space in various rooms. The cardboard will keep its shape and remain firm, so it is easy to prop up against walls and in corners. If drawing isn't your thing, you can use a projector or an overhead to trace your image onto the cardboard.


    Decorative Elements
    • Fireplace Gate: I used a piece of cardboard and folded some strong creases to divide it into three sections. I cut out a pattern and spray painted it black and silver. Then I lined it witch a gold paint pen. I think I am going to use it on a faux fireplace in the Bible Study Bunkhouse.

    Sunday, March 21, 2010

    Blazing Star Lamp

    I wanted to make some sort of light feature for the Blazing Star Stables. I decided to make a star paper lantern. Origami has never been my forte. I don't think I have the patience for it, but I found a step-by-step guide for making a 3D star that even I could follow.
    I added a few steps to make this fit our theme:
    1. I started with black cardstock, but any dark color will work
    2. After I completed cutting and folding the points (but haven't glued them yet), I used spray paint to get a metallic look. I chose a brown hammered finish.
    3. Once the paint had dried, I used a hole punch to make a pattern in the cardstock. I chose a small circle, but any shape or pattern will work great.
    4. Next, I used a glue stick to glue a layer of tissue paper on the inside of the star-points to cover the holes that I had punched.
    5. After completing step four, I followed the guide and glued my folded points together. I used hot-glue to make it stronger
    6. Once each folded point is glued together, I used the guide to hot-glue all the points together. Since I wanted this to light up, I held off on sealing together the final points on the bottom of the star.
    7. Now, how you light the star is up to you. I chose to use Christmas lights. I fed a stream of lights up the points and secured the wires with masking tape. Since this made out of paper and paint, it is flammable, so be careful that your star never gets too hot.


    Now you have a blazing star for stables!

    Tuesday, March 16, 2010

    Stalactites & Stalagmites


    Since the mission room is the Firefly Caverns, the first thing I decided to tackle was some 3D stalagmites and stalactites. I wanted to be able to hang the stalactites from the ceiling, so they needed to be light weight. I decided to use Great Stuff expanding foam (found at many hardware stores).

    How-To
    • First find something to use as a base for building the stalactite. It doesn't really matter what it looks like, because we will be peeling it off once we're finished. I prefer wax paper and poster board .
    • Spray the foam in a circular pattern or in the shape you want your stalactite (keep in mind that it expands). I would only spray a few layers at a time to keep it from collapsing. After it stiffens add a few more layers. Keep doing this until you get it to the shape that you want. Be very careful with the foam - it is very sticky, so try to keep it off your skin and clothes.
    • After you have the final shape of your stalactite and it has had time to harden, spray paint it to match the colors you are using in your Firefly Cavern. I mixed a flat-base and a satin-base to give the look of moisture.
    • Once your stalactite is dry, it is time to peel it off the base (this is where the wax paper comes in handy). If you used wax paper it should peel off easy. Peel carefully to make sure you don't crack your new stalactite.
    • When it is time to hang them from the ceiling, take a quilting needle and feed fishing line through the eye. Find a spot on the bottom of the stalactite and feed the needle through the foam. Once your line is through, your stalactite is ready to hang in your Firefly Cavern!
     
    Design by Free WordPress Themes | Bloggerized by Lasantha - Premium Blogger Themes | Macys Printable Coupons